Modular Finite State Machine
A modular finite state machine in Unity
https://github.com/thatgamesguy/modular_fsm_unity
1 forks.
2 stars.
0 open issues.
Recent commits:
- moved from gandhi games, Robert Wells
- Initial commit, GitHub
In this tutorial I outline a modular approach to writing a FSM. You can find the source code for this post at the GitHub page (link above).
A Finite-state Machine (FSM) is one of the more popular data structures for game AI programming and is also popular outside the domain of game AI; for example, in my game development series, instead of writing a single large class to manage our scenes, we split the logic for each scene into separate classes and use a FSM to manage the transitions between scenes. You can find the FSM tutorial for scene management here, which outlines how to write a simple FSM in C++. The popularity of FSMs is in part due to its simplicity and its ability to help break down an initial problem into a number of smaller, more manageable sub-problems.
FSMs generally consist of three parts: states, transitions and boundaries (also called conditions). The states contain the actual AI behaviour, transitions provide a method or moving between states, and boundaries/conditions provide the reason to move between the states. An agent will maintain a state until a certain condition is met and then it will transition to a new state, it’s as simple as that.
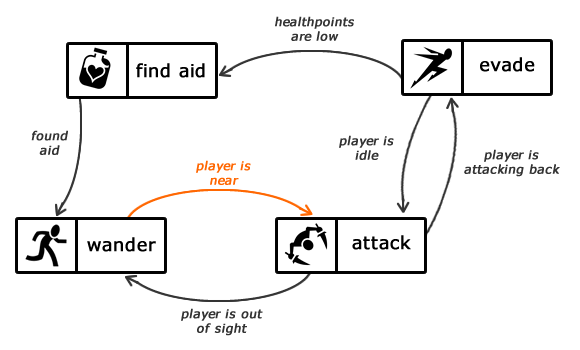
A simple example of a FSM layout for a typical enemy is shown below. The image was found here

Using this state machine, the enemy will start wandering around the environment (the initial state) and will then transition into attacking the player if the player is near (the condition). Once in the attacking state, the enemy can either move back into the wandering state (if the player moves out of sight) or move into an evade state if the player begins attacking back (another condition). Lastly if the enemy is in the evade state, it will check its current hit points and if it is below a certain threshold, transition into a ‘find aid’ state. While this is a basic example, you can see how a FSM helps to split complex problems into smaller ones.
So we can say a FSM has:
- A fixed number of states. You usually try to minimise the number of states one entity has, as a large number of states can become cumbersome.
- An entity can only be in one state at any one time, although a state can have a number of actions and transitional checks (more on that later).
- Each transition points to another state so that when the transitions criteria are met the entity moves to the associated state.
A FSM is relatively simple (at least when compared to other AI systems) and can replace a unwieldy set of switches/if statements with associated flags. However, it is not the only data structure out there, alternatives to FSM include: Goal Oriented Action Planning and Behaviour Trees.
My implementation of a modular FSM (the link to GitHub project can be found at top of this page) contains four main classes:
- FSM: controls the state machine transitions and contains all the states.
- FSMState: composed of a number of actions and reasons.
- FSMAction: an action to be performed while the agent is in the state.
- FSMReason: a transitional test. Contains the condition and ID of the state that should be transitioned to when the condition has been met.
An example of a typical enemy AI implementation is shown in the snippet below.
/* Build FSM actions */

var followPathAction = new FollowPathToRandomAction ();
var seekPlayerAction = new SeekTargetAction ();
var attackPlayerAction = new MeleeTowardsTargetAction ();

/* Build FSM reasons */

var playerInSightReason = new TargetInSightReason ();
var playerNotInSightReason = new TargetNotInSightReason ();
var playerInRangeReason = new TargetInRangeReason ();
var playerNotInRangeReason = new TargetNotInRangeReason ();

/* Create states */

// Follow path.
stateMachine.AddState (new State (GlobalStateData.FSMStateID.FollowPathToTarget, followPathAction, playerInSightReason));

// Seek to players position.
var seekPlayerReasons = new List<FSMReason> () { playerInRangeReason, playerNotInSightReason };
stateMachine.AddState (new State (GlobalStateData.FSMStateID.SeekTarget, seekPlayerAction, seekPlayerReasons));

// Attack player.
var attackActions = new List<FSMAction> (){ seekPlayerAction, attackPlayerAction };
stateMachine.AddState (new State (GlobalStateData.FSMStateID.AttackTarget, attackActions, playerNotInRangeReason));
You can have any number of actions and reasons in one state. By separating actions and reasons into there own separate classes (or modules) you can create new bespoke states by combining these modules in different ways. This means you do not need to re-write any state logic for states that behave similarly.
Although this was a very quick run through of my modular FSM, I hope that it at least provides a springboard from which you can implement and extend the code. Thank you for reading 
